JavaScript教程-创建可编辑的 JavaScript 表格

在本文中,我们将了解如何使用 JavaScript 创建可编辑的表格。首先,我们将对 JavaScript 编程进行基本概述。之后,我们将通过一些示例来理解这个概念。
什么是 JavaScript?
JavaScript,简称 JS。它是一种用于网页开发、Web 应用程序、游戏开发等的动态编程语言。它允许您在网页上实现动态特性,这些特性仅通过 HTML 和 CSS 是无法实现的。
它是一种高级语言,通常是即时编译的,支持多种编程范式。它具有花括号语法 {},动态类型,基于原型的面向对象,以及一流函数。
什么是 JavaScript 可编辑表格?
在 JavaScript 中创建表格后,您可以插入和合并行和列,或通过调整表格单元格的宽度、颜色和对齐方式来格式化表格。您可以在单元格、行或表格上使用 contenteditable 属性来编辑表格。
让我们通过各种 JavaScript 可编辑表格的示例来了解。
示例 1:
<! DOCTYPE html>
<html>
<head>
<meta name="viewport" content="width=device-width, initial-scale=1">
<meta charset="UTF-8">
<title> JavaScript editable table </title>
<link href="https://cdnjs.cloudflare.com/ajax/libs/font-awesome/4.7.0/css/font-awesome.css">
<link href="https://cdnjs.cloudflare.com/ajax/libs/twitter-bootstrap/4.0.0-alpha.6/css/bootstrap.min.css">
</head>
<style>
@import url('https://fonts.googleapis.com/css?family=Montserrat:400,500');
body {
font-family: 'Montserrat', sans-serif;
text-align: center;
}
body{
background-color: rgb(63,72,83);
font-family: sans-serif;
color: rgb(220,220,220);
overflow-x: hidden;
}
tr:first-child { color: #FB667A; }
td:hover {
color: white;
font-weight: bold;
transition-delay: 0s;
transition-duration: 0.4s;
transition-property: all;
transition-timing-function: line;
}
h1 {
position: relative;
padding: 0;
margin: 10;
font-family: "Raleway", sans-serif;
font-weight: 400;
font-size: 40px;
color: white;
-webkit-transition: all 0.4s ease 0s;
-o-transition: all 0.4s ease 0s;
transition: all 0.4s ease 0s;
}
.table {
width: 100%;
thead {
th {
padding: 10px 10px;
background: #00adee;
font-size: 25px;
text-transform: uppercase;
vertical-align: top;
color: #1D4A5A;
font-weight: normal;
text-align: left;
}
}
tbody {
tr {
td {
padding: 10px;
background: #f2f2f2;
font-size: 14px;
}
}
}
}
.add {
outline: none;
background: none;
border: none;
}
.edit {
outline: none;
background: none;
border: none;
}
.save {
outline: none;
background: none;
border: none;
}
.delete {
outline: none;
background: none;
border: none;
}
.edit {
padding: 5px 10px;
cursor: pointer;
}
.save {
padding: 5px 10px;
cursor: pointer;
}
.delete {
padding: 5px 10px;
cursor: pointer;
}
.add {
float: right;
background: transparent;
border: 1px solid black;
color: black;
font-size: 13px;
padding: 0;
padding: 3px 5px;
cursor: pointer;
&:hover {
background: #ffffff;
color: #00adee;
}
}
.save {
display: none;
background: #32AD60;
color: #ffffff;
&:hover {
background: darken(#32AD60, 10%);
}
}
.edit {
background: #2199e8;
color: #ffffff;
&:hover {
background: darken(#2199e8, 10%);
}
}
.delete {
background: #EC5840;
color: #ffffff;
&:hover {
background: darken(#EC5840, 10%);
}
}
</style>
<body>
<table class="table data">
<h1> Example </h1>
<thead>
<tr>
<th> Name </th>
<th> Email </th>
<th> Number </th>
</tr>
</thead>
<tbody>
<tr>
<td class="data"> John Doe </td>
<td class="data"> johndoe@john.com </td>
<td class="data"> 666-666-666 </td>
<td>
<button class="save"> Save </button>
<button class="edit"> Edit </button>
<button class="delete"> Delete </button>
</td>
</tr>
<tr>
<td class="data"> John Doe </td>
<td class="data"> johndoe@john.com </td>
<td class="data"> 666-666-666 </td>
<td>
<button class="save"> Save </button>
<button class="edit"> Edit </button>
<button class="delete"> Delete </button>
</td>
</tr>
</tbody>
</table>
<script src="https://cdnjs.cloudflare.com/ajax/libs/jquery/3.3.1/jquery.min.js"> </script>
<script>
$(document).on('click', '.edit', function() {
$(this).parent().siblings('td.data').each(function() {
var content = $(this).html();
$(this).html('<input value="' + content + '" />');
});
$(this).siblings('.save').show();
$(this).siblings('.delete').hide();
$(this).hide();
});
$(document).on('click', '.save', function() {
$('input').each(function() {
var content = $(this).val();
$(this).html(content);
$(this).contents().unwrap();
});
$(this).siblings('.edit').show();
$(this).siblings('.delete').show();
$(this).hide();
});
$(document).on('click', '.delete', function() {
$(this).parents('tr').remove();
});
$('.add').click(function() {
$(this).parents('table').append('<tr><td class="data"></td><td class="data"></td><td class="data"></td><td><button class="save">Save</button><button class="edit">Edit</button> <button class="delete">Delete</button></td></tr>');
});
</script>
</body>
</html> 解释:
在上面的示例中,我们使用 JavaScript 编辑了表格数据。要使表格单元格可编辑,单击单元格即可(在单元格内部会出现文本输入框)。我们可以更改表格的内容。
输出:
以下是此示例的输出示例:

示例 2:
<! DOCTYPE html>
<html>
<head>
<meta name="viewport" content="width=device-width, initial-scale=1">
<meta charset="UTF-8">
<title> JavaScript editable table </title>
<link href="https://cdnjs.cloudflare.com/ajax/libs/font-awesome/4.7.0/css/font-awesome.css">
<link href="https://cdnjs.cloudflare.com/ajax/libs/twitter-bootstrap/4.0.0-alpha.6/css/bootstrap.min.css">
</head>
<style>
 @import url('https://fonts.googleapis.com/css?family=Montserrat:400,500');
body {
  font-family: 'Montserrat', sans-serif;
  padding: 0;
  margin: 0;
  text-align: center;
}
h1 {
  position: relative;
  padding: 0;
  margin: 10;
  font-family: "Raleway", sans-serif;
  font-weight: 300;
  font-size: 40px;
  color: #080808;
  -webkit-transition: all 0.4s ease 0s;
  -o-transition: all 0.4s ease 0s;
  transition: all 0.4s ease 0s;
}
body {
  font-size: 0.75em;
}
table {
  border-spacing: 10px;
}
tr > th {
  text-align: right;
}
.table-fill {
  background: white;
  border-radius:3px;
  border-collapse: collapse;
  height: 320px;
  margin: auto;
  max-width: 600px;
  padding:5px;
  width: 100%;
  box-shadow: 0 5px 10px rgba(0, 0, 0, 0.1);
  animation: float 5s infinite;
}
th {
  color: #D5DDE5;;
  background: #1b1e24;
  border-bottom: 4px solid #9ea7af;
  border-right: 1px solid #343a45;
  font-size: 23px;
  font-weight: 100;
  padding: 24px;
  text-align: left;
  text-shadow: 0 1px 1px rgba(0, 0, 0, 0.1);
  vertical-align: middle;
}
th:first-child {
  border-top-left-radius: 3px;
}
th:last-child {
  border-top-right-radius: 3px;
  border-right: none;
}
  tr {
  border-top: 1px solid #C1C3D1;
  border-bottom-: 1px solid #C1C3D1;
  color: #666B85;
  font-size: 16px;
  font-weight: normal;
  text-shadow: 0 1px 1px rgba(256, 256, 256, 0.1);
}
 tr:hover td {
  background: #4E5066;
  color: #FFFFFF;
  border-top: 1px solid #22262e;
}
 tr:first-child {
  border-top: none;
}
tr:last-child {
  border-bottom: none;
}
tr:nth-child(odd) td {
  background: #EBEBEB;
}
tr:nth-child(odd):hover td {
  background: #4E5066;
}
tr:last-child td:first-child {
  border-bottom-left-radius: 3px;
}
tr:last-child td:last-child {
  border-bottom-right-radius: 3px;
}
 td:last-child {
  border-right: 0px;
}
td {
  background: #FFFFFF;
  padding: 20px;
  text-align: left;
  vertical-align: middle;
  font-weight: 300;
  font-size: 18px;
  text-shadow: -1px -1px 1px rgba(0, 0, 0, 0.1);
  border-right: 1px solid #C1C3D1;
}
</style>
<body>
<h1> Example </h1>
<table summary="Editable table with datasets ordered in columns" class="table-fill">
  <tbody>
    <tr>
      <th scope="col"> Month </th>
      <th scope="col"> Sales </th>
    </tr>
    <tr>
      <th scope="row"> January </th>
      <td> 16000 </td>
    </tr>
    <tr>
      <th scope="row"> February </th>
      <td> 10000</td>
    </tr>
    <tr>
      <th scope="row"> March </th>
      <td> 20000 </td>
    </tr>
    <tr>
      <th scope="row"> April </th>
      <td> 7300 </td>
    </tr>
    <tr>
      <th scope="row"> May </th>
      <td> 12000 </td>
    </tr>
    <tr>
      <th scope="row"> June </th>
      <td> 1099 </td>
    </tr>
  </tbody>
</table>
<br />
<script src="https://cdnjs.cloudflare.com/ajax/libs/jquery/3.3.1/jquery.min.js"> </script>
<script>
var table = document.querySelector('table');
var dataCells = table.querySelectorAll('tr > td');
var rows = table.querySelectorAll('tr');
var code = document.querySelector('code');
var resetButton = document.querySelector('.reset');
rows = Array.prototype.slice.call(rows, 1);
var ncols = rows[0].children.length - 1;
var initialData = {0:[1,2,3,4,5],1:[6,7,8,9,10],2:[11,12,13,14,15]};
function parseTable () {
  var d = {};
  Array.prototype.forEach.call(rows, function (row, i) {
    var rowrowCells = row.querySelectorAll('td');
    return Array.prototype.map.call(rowCells, function (cell, j) {
      if (!d[j]) d[j] = [];
      d[j].push(parseInt(cell.textContent, 10));
    });
  });
  return d;
}
function setTableData (data) {
  Array.prototype.forEach.call(rows, function (row, i) {
    var rowrowCells = row.querySelectorAll('td');
    return Array.prototype.map.call(rowCells, function (cell, j) {
      cell.textContent = initialData[j][i];
    });
  });
}
Array.prototype.forEach.call(dataCells, function (cell) {
  cell.contentEditable = true;
});
table.addEventListener('keyup', function (e) {
  if (e.target.tagName === 'TD') {
    setTimeout(function () {
      code.innerText = JSON.stringify( parseTable() );
    }, 0);
  }
});
</script>
</body>
</html>
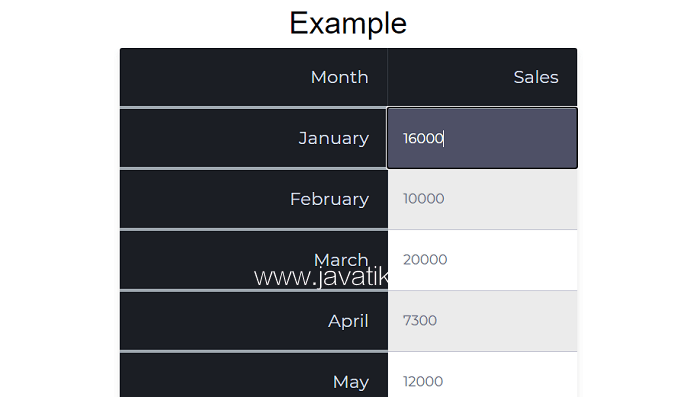
解释:
在上面的示例中,我们使用 JavaScript 编辑了表格数据。要使表格单元格可编辑,单击单元格即可。在此示例中,我们主要关注单元格中的数字数据,并使其可编辑。
输出:
以下是此示例的输出示例:

示例 3:
<! DOCTYPE html>
<html>
<head>
<meta name="viewport" content="width=device-width, initial-scale=1">
<meta charset="UTF-8">
<title> JavaScript editable table </title>
<link href="https://cdnjs.cloudflare.com/ajax/libs/font-awesome/4.7.0/css/font-awesome.css">
<link href="https://maxcdn.bootstrapcdn.com/bootstrap/4.0.0/css/bootstrap.min.css">
</head>
<style>
 @import url('https://fonts.googleapis.com/css?family=Montserrat:400,500');
body {
  font-family: 'Montserrat', sans-serif;
  padding: 0;
  margin: 0;
  text-align: center;
}
h1 {
  position: relative;
  padding: 0;
  margin: 10;
  font-family: "Raleway", sans-serif;
  font-weight: 300;
  font-size: 40px;
  color: #080808;
  -webkit-transition: all 0.4s ease 0s;
  -o-transition: all 0.4s ease 0s;
  transition: all 0.4s ease 0s;
}
tr:nth-of-type(odd) {
    background: #eee;
    }
    th {
    background: #3498db;
    color: white;
    font-weight: bold;
    }

@import "compass/css3";
.table-editable {
  position: relative;
  .glyphicon {
    font-size: 20px;
  }
}
table {
    width: 750px;
    border-collapse: collapse;
    margin:50px auto;
    }
    td, th {
    padding: 10px;
    border: 1px solid #ccc;
    text-align: left;
    font-size: 18px;
    }
.table-remove {
  color: #700;
  cursor: pointer;
  &:hover {
    color: #f00;
  }
}
.table-up {
  color: #007;
  cursor: pointer;
  &:hover {
    color: #00f;
  }
}
.table-down {
  color: #007;
  cursor: pointer;
  &:hover {
    color: #00f;
  }
}
.table-add {
  color: #070;
  cursor: pointer;
  position: absolute;
  top: 8px;
  right: 0;
  &:hover {
    color: #0b0;
  }
}
</style>
<body>
<div class="container">
  <h1> JavaScript Editable Table </h1>
  <div id="table" class="table-editable">
    <table class="table">
      <tr>
        <th> Name</th>
        <th> Roll No </th>
        <th> Class </th>
        <th> Marks </th>
      </tr>
      <tr>
        <td contenteditable="true"> Ram </td>
        <td contenteditable="true"> 1 </td>
        <td contenteditable="true"> BA </td>
    <td contenteditable="true"> 48 </td>
      </tr>
<tr>
        <td contenteditable="true"> Rama </td>
        <td contenteditable="true"> 10 </td>
       <td contenteditable="true"> BSC </td>
  <td contenteditable="true"> 40 </td>
      </tr>
        <tr>
        <td contenteditable="true"> sham </td>
        <td contenteditable="true"> 8 </td>
       <td contenteditable="true"> BCA </td>
      <td contenteditable="true"> 34 </td>
      </tr>
    <tr>
        <td contenteditable="true"> shama </td>
        <td contenteditable="true"> 3 </td>
    <td contenteditable="true"> BCA </td>
    <td contenteditable="true"> 30 </td>
      </tr>
    </table>
  </div>
</div>
<script src="https://cdnjs.cloudflare.com/ajax/libs/jquery/3.3.1/jquery.min.js"> </script>
<script>
var $TABLE = $('#table');
var $BTN = $('#export-btn');
var $EXPORT = $('#export');
$('.table-add').click(function () {
  var $clone = $TABLE.find('tr.hide').clone(true).removeClass('hide table-line');
  $TABLE.find('table').append($clone);
});
$('.table-remove').click(function () {
  $(this).parents('tr').detach();
});
$('.table-up').click(function () {
  var $row = $(this).parents('tr');
  if ($row.index() === 1) return;
  $row.prev().before($row.get(0));
});
$('.table-down').click(function () {
  var $row = $(this).parents('tr');
  $row.next().after($row.get(0));
});
jQuery.fn.pop = [].pop;
jQuery.fn.shift = [].shift;
$BTN.click(function () {
  var $rows = $TABLE.find('tr:not(:hidden)');
  var headers = [];
  var data = [];
    $($rows.shift()).find('th:not(:empty)').each(function () {
    headers.push($(this).text().toLowerCase());
  });
  $rows.each(function () {
    var $td = $(this).find('td');
    var h = {};
        headers.forEach(function (header, i) {
      h[header] = $td.eq(i).text();
    });
        data.push(h);
  });
    });
</script>
</body>
</html>
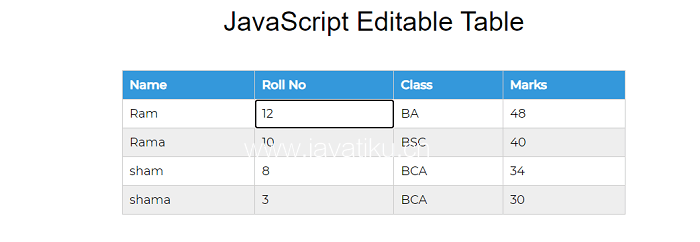
解释:
这个示例演示了一个更复杂的可编辑表格。单击单元格即可编辑产品名称和价格。
输出:
以下是此示例的输出示例:

请注意,这些示例提供了使用 JavaScript 创建可编辑表格的方法。每个示例都有其自己的样式和结构,但基本方法保持一致:使用 JavaScript 切换表格单元格的编辑模式,允许用户更新数据并保存更改。


