Spring boot教程-Spring Boot REST 示例

REST 应用程序遵循 REST 架构方法。我们使用 REST 应用程序来开发和设计网络应用程序。它生成执行数据的 CRUD 操作的 HTTP 请求。通常,它以 JSON 或 XML 格式返回数据。
Spring Boot REST API 示例
在下面的示例中,我们将创建一个 REST 应用程序。在这个应用程序中,我们创建了一个产品列表,并返回相同的列表。它以 JSON 格式返回数据。
让我们按照以下步骤在 REST 应用程序中实现它并理解 REST 方法。
步骤 1: 打开 Spring Initializr https://start.spring.io/。
步骤 2: 选择 Spring Boot 版本 2.3.0.M2。
步骤 3: 提供 Group 名称。我们提供了 Group 名称 cn.javatiku。
步骤 4: 提供 Artifact。我们提供了 Artifact spring-boot-rest-example。
步骤 5: 添加 Spring Web 依赖项。
步骤 6: 单击生成按钮。当单击生成按钮时,它将所有与应用程序相关的规范包装到一个 Jar 文件中,并将其下载到本地系统。
步骤 7: 解压缩 jar 文件。
步骤 8: 复制该文件夹并粘贴到 STS 工作区。
步骤 9: 导入项目。
文件 -> 导入 -> 现有的 Maven 项目 -> 下一步 -> 浏览 -> 选择文件夹 spring-boot-rest-example -> 选择文件夹 -> 完成
导入项目需要一些时间。当项目成功导入后,我们可以在 IDE 的 Package Explorer 部分看到它。
步骤 10: 在包 cn.javatiku 中创建一个模型类。我们创建了一个名为 Product 的模型类。在这个类中,进行以下操作:
- 创建五个变量 id、pname、batchno、price 和 noofproduct。
- 创建默认构造函数。
- 通过字段生成构造函数。
- 通过字段生成 Getters 和 Setters。
完成所有步骤后,模型类如下所示。
Product.java
package cn.javatiku;
public class Product
{
private int id;
private String pname;
private String batchno;
private double price;
private int noofproduct;
//default constructor
public Product()
{

}
//constructor using fields
public Product(int id, String pname, String batchno, double price, int noofproduct)
{
super();
this.id = id;
this.pname = pname;
this.batchno = batchno;
this.price = price;
this.noofproduct = noofproduct;
}
//getters and setters
public int getId()
{
return id;
}
public void setId(int id)
{
this.id = id;
}
public String getPname()
{
return pname;
}
public void setPname(String pname)
{
this.pname = pname;
}
public String getBatchno()
{
return batchno;
}
public void setBatchno(String batchno)
{
this.batchno = batchno;
}
public double getPrice()
{
return price;
}
public void setPrice(double price)
{
this.price = price;
}
public int getNoofproduct()
{
return noofproduct;
}
public void setNoofproduct(int noofproduct)
{
this.noofproduct = noofproduct;
}
}
步骤 11: 在包 cn.javatiku 中创建一个控制器。我们创建了一个名为 ProductController 的控制器。
- 使用注解 @RestController 注解该类。
- 我们注入了 IProductService 接口。我们将在下一步中创建它。
- 通过使用 @GetMapping 注解,创建了映射 /product。
- 通过映射一个方法 getProduct() 到 /product。该方法返回一个产品列表。
ProductController.java
package cn.javatiku;
import java.util.List;
import org.springframework.beans.factory.annotation.Autowired;
import org.springframework.web.bind.annotation.GetMapping;
import org.springframework.web.bind.annotation.RestController;
@RestController
public class ProductController
{
@Autowired
private IProductService productService;
//mapping the getProduct() method to /product
@GetMapping(value = "/product")
public List<Product> getProduct()
{
//finds all the products
List<Product> products = productService.findAll();
//returns the product list
return products;
}
}
步骤 12: 在包 cn.javatiku 中创建一个接口,名称为 IProductService,并定义返回产品列表的 findAll() 方法。
IProductService.java
package cn.javatiku;
import java.util.List;
public interface IProductService
{
List<Product> findAll();
}
步骤 13: 创建一个服务类。我们在包 cn.javatiku 中创建一个名为 ProductService 的服务类。
- 使用 @Service 注解该类,并实现 IProductService 接口。
- 在该类中,通过 @Override 注解重写 findAll() 方法。ProductService 类的 findAll() 方法覆盖了 IProductService 接口的 findAll() 方法。
- 创建一个 ArrayList 对象。
- 向 ArrayList 中添加产品。
- 返回产品列表。
ProductService.java
package cn.javatiku;
import java.util.ArrayList;
import java.util.List;
import org.springframework.stereotype.Service;
@Service
public class ProductService implements IProductService
{
@Override
public List<Product> findAll()
{
//creating an object of ArrayList
ArrayList<Product> products = new ArrayList<Product>();
//adding products to the List
products.add(new Product(100, "Mobile", "CLK98123", 9000.00, 6));
products.add(new Product(101, "Smart TV", "LGST09167", 60000.00, 3));
products.add(new Product(102, "Washing Machine", "38753BK9", 9000.00, 7));
products.add(new Product(103, "Laptop", "LHP29OCP", 24000.00, 1));
products.add(new Product(104, "Air Conditioner", "ACLG66721", 30000.00, 5));
products.add(new Product(105, "Refrigerator ", "12WP9087", 10000.00, 4));
//returns a list of product
return products;
}
}
步骤 14: 在 static 文件夹(src/main/resources/static)中创建一个 HTML 文件。我们创建了一个名为 index 的 HTML 文件。在该文件中,我们创建了一个名为 "Get all Products" 的链接。
index.html
<!DOCTYPE html>
<html>
<head>
<title>Home page</title>
<meta charset="UTF-8">
<meta name="viewport" content="width=device-width, initial-scale=1.0">
</head>
<body>
<p>
<a href="product">Get all Products</a>
</p>
</body>
</html>
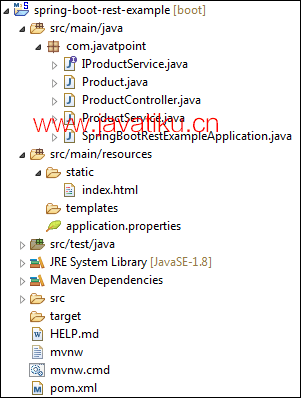
现在,我们已经创建了所有的文件和文件夹。创建所有文件后,项目目录如下所示:

步骤 15: 打开 SpringBootRestExampleApplication.java 文件,并将其作为 Java 应用程序运行。默认情况下,它在端口 8080 上运行。
SpringBootRestExampleApplication.java
package cn.javatiku;
import org.springframework.boot.SpringApplication;
import org.springframework.boot.autoconfigure.SpringBootApplication;
@SpringBootApplication
public class SpringBootRestExampleApplication
{
public static void main(String[] args)
{
SpringApplication.run(SpringBootRestExampleApplication.class, args);
}
}
当应用程序成功运行时,它会显示如下的消息:

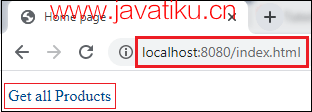
步骤 16: 打开浏览器,调用 URL http://localhost:8080/index.html。它会显示 "Get all Products" 的链接,如下图所示。
点击 "Get all Products" 链接。它会返回一个以 JSON 格式表示的产品列表,并且 URL 会变为 http://localhost:8080/product。

