Spring教程-Spring MVC CRUD 示例

这篇文档介绍了如何使用Spring MVC和JdbcTemplate开发一个简单的CRUD(创建、读取、更新和删除)应用程序。下面是每个部分的概述和内容翻译:
创建数据表
这里使用了MySQL数据库中的emp99表。它有4个字段:id、name、salary和designation。其中,id是自增的,由序列生成。

Spring MVC CRUD示例
1. 在pom.xml文件中添加依赖项。
这里展示了pom.xml文件中的依赖项,涵盖了Spring Web MVC、Apache Tomcat Jasper、Servlet API、JSTL和MySQL Connector等。
<!-- https://mvnrepository.com/artifact/org.springframework/spring-webmvc -->
<dependency>
    <groupId>org.springframework</groupId>
    <artifactId>spring-webmvc</artifactId>
    <version>5.1.1.RELEASE</version>
</dependency>

<!-- https://mvnrepository.com/artifact/org.apache.tomcat/tomcat-jasper -->
<dependency>
    <groupId>org.apache.tomcat</groupId>
    <artifactId>tomcat-jasper</artifactId>
    <version>9.0.12</version>
</dependency>
    <!-- https://mvnrepository.com/artifact/javax.servlet/javax.servlet-api -->
<dependency>
    <groupId>javax.servlet</groupId>
    <artifactId>servlet-api</artifactId>
    <version>3.0-alpha-1</version>
</dependency>
<!-- https://mvnrepository.com/artifact/javax.servlet/jstl -->
<dependency>
    <groupId>javax.servlet</groupId>
    <artifactId>jstl</artifactId>
    <version>1.2</version>
</dependency>
    <!-- https://mvnrepository.com/artifact/mysql/mysql-connector-java -->
<dependency>
    <groupId>mysql</groupId>
    <artifactId>mysql-connector-java</artifactId>
    <version>8.0.11</version>
</dependency>
    <!-- https://mvnrepository.com/artifact/org.springframework/spring-jdbc -->
<dependency>
    <groupId>org.springframework</groupId>
    <artifactId>spring-jdbc</artifactId>
    <version>5.1.1.RELEASE</version>
</dependency>
2. 创建Bean类
这是一个包含与数据库字段相对应的变量(以及setter和getter方法)的Bean类。它表示数据库中的实体。
package cn.javatiku.beans;

public class Emp {
private int id;
private String name;
private float salary;
private String designation;

public int getId() {
    return id;
}
public void setId(int id) {
    this.id = id;
}
public String getName() {
    return name;
}
public void setName(String name) {
    this.name = name;
}
public float getSalary() {
    return salary;
}
public void setSalary(float salary) {
    this.salary = salary;
}
public String getDesignation() {
    return designation;
}
public void setDesignation(String designation) {
    this.designation = designation;
}

}
3. 创建Controller类
这个Controller类处理与前端交互的逻辑。它包含了添加、保存、编辑、更新和删除等操作的方法。
package cn.javatiku.controllers;
import java.util.List;
import org.springframework.beans.factory.annotation.Autowired;
import org.springframework.stereotype.Controller;
import org.springframework.ui.Model;
import org.springframework.web.bind.annotation.ModelAttribute;
import org.springframework.web.bind.annotation.PathVariable;
import org.springframework.web.bind.annotation.RequestMapping;
import org.springframework.web.bind.annotation.RequestMethod;
import cn.javatiku.beans.Emp;
import cn.javatiku.dao.EmpDao;
@Controller
public class EmpController {
    @Autowired
    EmpDao dao;//will inject dao from XML file

    /*It displays a form to input data, here "command" is a reserved request attribute
     *which is used to display object data into form
     */
    @RequestMapping("/empform")
    public String showform(Model m){
        m.addAttribute("command", new Emp());
        return "empform";
    }
    /*It saves object into database. The @ModelAttribute puts request data
     *  into model object. You need to mention RequestMethod.POST method
     *  because default request is GET*/
    @RequestMapping(value="/save",method = RequestMethod.POST)
    public String save(@ModelAttribute("emp") Emp emp){
        dao.save(emp);
        return "redirect:/viewemp";//will redirect to viewemp request mapping
    }
    /* It provides list of employees in model object */
    @RequestMapping("/viewemp")
    public String viewemp(Model m){
        List<Emp> list=dao.getEmployees();
        m.addAttribute("list",list);
        return "viewemp";
    }
    /* It displays object data into form for the given id.
     * The @PathVariable puts URL data into variable.*/
    @RequestMapping(value="/editemp/{id}")
    public String edit(@PathVariable int id, Model m){
        Emp emp=dao.getEmpById(id);
        m.addAttribute("command",emp);
        return "empeditform";
    }
    /* It updates model object. */
    @RequestMapping(value="/editsave",method = RequestMethod.POST)
    public String editsave(@ModelAttribute("emp") Emp emp){
        dao.update(emp);
        return "redirect:/viewemp";
    }
    /* It deletes record for the given id in URL and redirects to /viewemp */
    @RequestMapping(value="/deleteemp/{id}",method = RequestMethod.GET)
    public String delete(@PathVariable int id){
        dao.delete(id);
        return "redirect:/viewemp";
    }
}
4. 创建DAO类
DAO(数据访问对象)类用于访问数据库并执行数据操作。它包含了保存、更新、删除和查询数据的方法。
package cn.javatiku.dao;
import java.sql.ResultSet;
import java.sql.SQLException;
import java.util.List;
import org.springframework.jdbc.core.BeanPropertyRowMapper;
import org.springframework.jdbc.core.JdbcTemplate;
import org.springframework.jdbc.core.RowMapper;
import cn.javatiku.beans.Emp;

public class EmpDao {
JdbcTemplate template;

public void setTemplate(JdbcTemplate template) {
    this.template = template;
}
public int save(Emp p){
    String sql="insert into Emp99(name,salary,designation) values('"+p.getName()+"',"+p.getSalary()+",'"+p.getDesignation()+"')";
    return template.update(sql);
}
public int update(Emp p){
    String sql="update Emp99 set name='"+p.getName()+"', salary="+p.getSalary()+",designation='"+p.getDesignation()+"' where id="+p.getId()+"";
    return template.update(sql);
}
public int delete(int id){
    String sql="delete from Emp99 where id="+id+"";
    return template.update(sql);
}
public Emp getEmpById(int id){
    String sql="select * from Emp99 where id=?";
    return template.queryForObject(sql, new Object[]{id},new BeanPropertyRowMapper<Emp>(Emp.class));
}
public List<Emp> getEmployees(){
    return template.query("select * from Emp99",new RowMapper<Emp>(){
        public Emp mapRow(ResultSet rs, int row) throws SQLException {
            Emp e=new Emp();
            e.setId(rs.getInt(1));
            e.setName(rs.getString(2));
            e.setSalary(rs.getFloat(3));
            e.setDesignation(rs.getString(4));
            return e;
        }
    });
}
}
5. 在web.xml文件中配置Controller的入口
在web.xml文件中,配置了DispatcherServlet,以便将请求路由到相应的Controller。
<?xml version="1.0" encoding="UTF-8"?>
<web-app xmlns:xsi="http://www.w3.org/2001/XMLSchema-instance" xmlns="http://java.sun.com/xml/ns/javaee" xsi:schemaLocation="http://java.sun.com/xml/ns/javaee http://java.sun.com/xml/ns/javaee/web-app_3_0.xsd" id="WebApp_ID" version="3.0">
  <display-name>SpringMVC</display-name>
   <servlet>
    <servlet-name>spring</servlet-name>
    <servlet-class>org.springframework.web.servlet.DispatcherServlet</servlet-class>
    <load-on-startup>1</load-on-startup>
</servlet>
<servlet-mapping>
    <servlet-name>spring</servlet-name>
    <url-pattern>/</url-pattern>
</servlet-mapping>
</web-app>
6. 在XML文件中定义Bean
在spring-servlet.xml文件中,配置了Spring的bean,包括视图解析器、数据源和JdbcTemplate等。
<?xml version="1.0" encoding="UTF-8"?>
<beans xmlns="http://www.springframework.org/schema/beans"
    xmlns:xsi="http://www.w3.org/2001/XMLSchema-instance"
    xmlns:context="http://www.springframework.org/schema/context"
    xmlns:mvc="http://www.springframework.org/schema/mvc"
    xsi:schemaLocation="
        http://www.springframework.org/schema/beans
        http://www.springframework.org/schema/beans/spring-beans.xsd
        http://www.springframework.org/schema/context
        http://www.springframework.org/schema/context/spring-context.xsd
        http://www.springframework.org/schema/mvc
        http://www.springframework.org/schema/mvc/spring-mvc.xsd">
<context:component-scan base-package="cn.javatiku.controllers"></context:component-scan>

<bean class="org.springframework.web.servlet.view.InternalResourceViewResolver">
<property name="prefix" value="/WEB-INF/jsp/"></property>
<property name="suffix" value=".jsp"></property>
</bean>

<bean id="ds" class="org.springframework.jdbc.datasource.DriverManagerDataSource">
<property name="driverClassName" value="com.mysql.jdbc.Driver"></property>
<property name="url" value="jdbc:mysql://localhost:3306/test"></property>
<property name="username" value=""></property>
<property name="password" value=""></property>
</bean>

<bean id="jt" class="org.springframework.jdbc.core.JdbcTemplate">
<property name="dataSource" ref="ds"></property>
</bean>

<bean id="dao" class="cn.javatiku.dao.EmpDao">
<property name="template" ref="jt"></property>
</bean>
</beans>
7. 创建请求页面
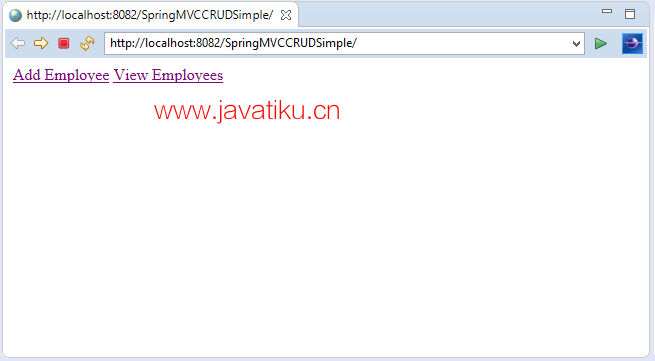
这里展示了一个简单的index.jsp页面
<a href="empform">Add Employee</a>
<a href="viewemp">View Employees</a>
8. 创建其他视图组件
这里展示了empform.jsp、empeditform.jsp和viewemp.jsp页面的内容,分别用于添加、编辑和查看员工的操作。
empform.jsp
<%@ taglib uri="http://www.springframework.org/tags/form" prefix="form"%>
<%@ taglib uri="http://java.sun.com/jsp/jstl/core" prefix="c"%>

        <h1>Add New Employee</h1>
       <form:form method="post" action="save">
        <table >
         <tr>
          <td>Name : </td>
          <td><form:input path="name"  /></td>
         </tr>
         <tr>
          <td>Salary :</td>
          <td><form:input path="salary" /></td>
         </tr>
         <tr>
          <td>Designation :</td>
          <td><form:input path="designation" /></td>
         </tr>
         <tr>
          <td> </td>
          <td><input type="submit" value="Save" /></td>
         </tr>
        </table>
       </form:form>
empeditform.jsp
<%@ taglib uri="http://www.springframework.org/tags/form" prefix="form"%>
<%@ taglib uri="http://java.sun.com/jsp/jstl/core" prefix="c"%>

        <h1>Edit Employee</h1>
       <form:form method="POST" action="/SpringMVCCRUDSimple/editsave">
        <table >
        <tr>
        <td></td>
         <td><form:hidden  path="id" /></td>
         </tr>
         <tr>
          <td>Name : </td>
          <td><form:input path="name"  /></td>
         </tr>
         <tr>
          <td>Salary :</td>
          <td><form:input path="salary" /></td>
         </tr>
         <tr>
          <td>Designation :</td>
          <td><form:input path="designation" /></td>
         </tr>

         <tr>
          <td> </td>
          <td><input type="submit" value="Edit Save" /></td>
         </tr>
        </table>
       </form:form>
viewemp.jsp
   <%@ taglib uri="http://www.springframework.org/tags/form" prefix="form"%>
   <%@ taglib uri="http://java.sun.com/jsp/jstl/core" prefix="c"%>

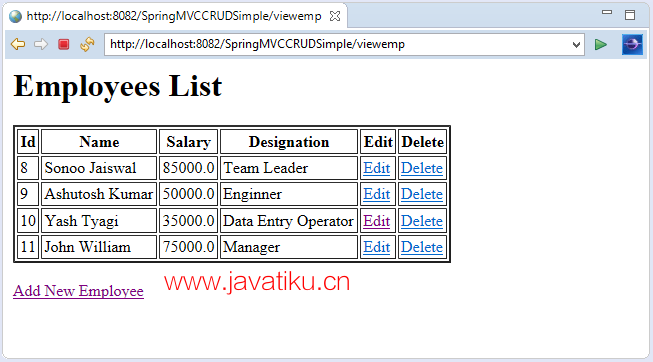
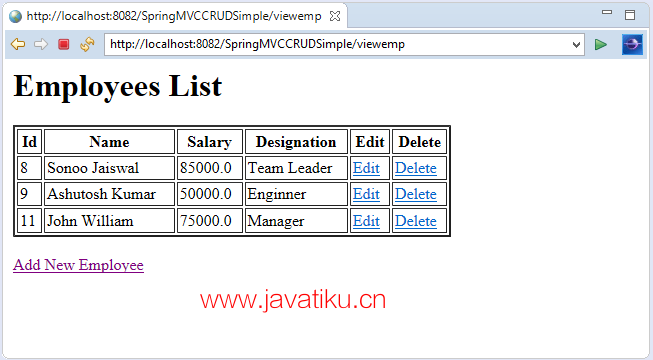
<h1>Employees List</h1>
<table border="2" width="70%" cellpadding="2">
<tr><th>Id</th><th>Name</th><th>Salary</th><th>Designation</th><th>Edit</th><th>Delete</th></tr>
   <c:forEach var="emp" items="${list}">
   <tr>
   <td>${emp.id}</td>
   <td>${emp.name}</td>
   <td>${emp.salary}</td>
   <td>${emp.designation}</td>
   <td><a href="editemp/${emp.id}">Edit</a></td>
   <td><a href="deleteemp/${emp.id}">Delete</a></td>
   </tr>
   </c:forEach>
   </table>
   <br/>
   <a href="empform">Add New Employee</a>
这个示例通过Spring MVC和JdbcTemplate演示了如何开发一个基本的CRUD应用程序。
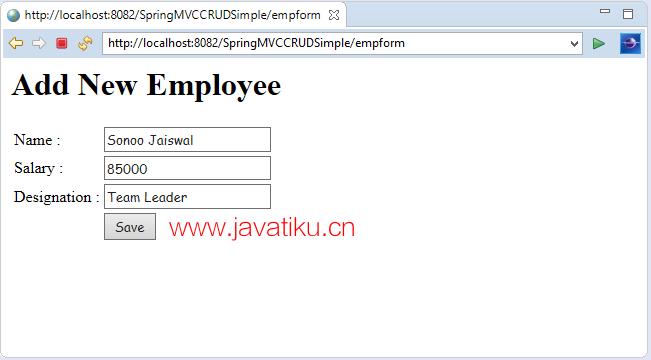
点击“添加员工”后,您将看到以下表单。
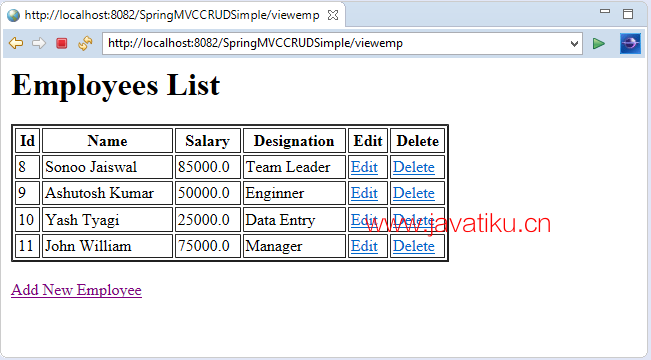
填写表单并点击“保存”将条目添加到数据库中。
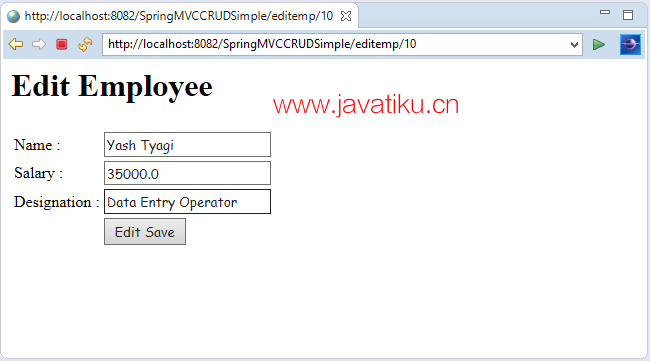
现在,点击“编辑”以对提供的数据进行一些更改。
现在,点击“编辑保存”以将带有更改的条目添加到数据库中。
现在,点击“删除”以从数据库中删除该条目。
下载此示例(使用Eclipse开发)
你可以按照这个示例来实践和理解Spring MVC的基本概念和用法。


