Spring Cloud教程-分布式跟踪简介

分布式跟踪简介
分布式跟踪
分布式跟踪是一种技术,用于监视和分析应用程序,尤其是那些使用微服务架构构建的应用程序。它也被称为分布式请求跟踪。开发人员使用分布式跟踪来调试和优化代码。
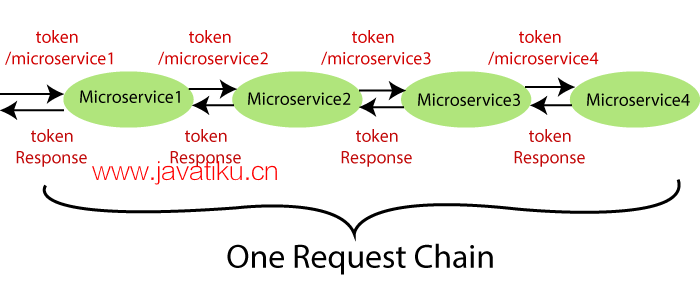
分布式跟踪提供了一个地方,我们可以查看特定请求的“发生了什么事情?”这很重要,因为微服务涉及多种组件。
如果我们想要解决问题或调试问题,我们需要一个集中的服务器。因此术语分布式跟踪就出现了。
在本节中,我们将使用Spring Cloud Sleuth和Zipkin。Spring Cloud Sleuth为我们的每个请求分配了一个唯一标识符。我们可以根据唯一标识符跟踪所有组件中的所有请求。
Spring Cloud Sleuth
Spring Cloud Sleuth是一个Spring Cloud库,它通过在适当的HTTP请求标头上添加跟踪和span ID的方式来跟踪后续微服务的进展。Sleuth库基于MDC(映射诊断上下文)概念,我们可以轻松提取值,将其放入上下文并在日志中显示它们。
Zipkin
Zipkin是一个开源的、基于Java的分布式跟踪系统。它具有一个管理控制台,用于发送、接收、存储和可视化后续服务的跟踪详细信息。
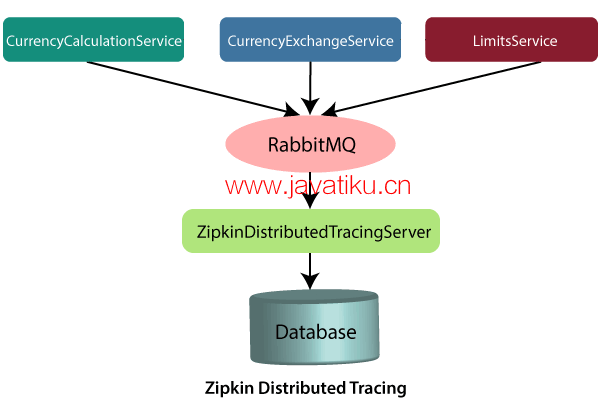
借助Zipkin服务器的帮助,我们可以将所有组件的日志放入消息队列(RabbitMQ)。我们将日志发送到Zipkin服务器,日志在此处汇总。完成后,我们可以监视不同的请求。我们还可以找出特定请求发生了什么事情?
使用Spring Cloud Sleuth实施分布式跟踪
在这一步中,我们将为所有微服务添加Spring Cloud Sleuth。它为所有请求添加了一个唯一的ID。它用于生成和附加跟踪ID和span ID到日志中,以便工具(Zipkin)可以使用这些ID。

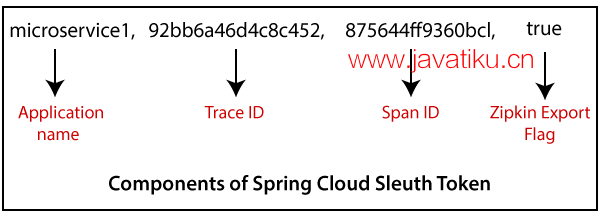
Spring Cloud Sleuth令牌具有以下组件:
- 应用程序名称: 在属性文件中定义的应用程序名称。
- 跟踪ID: Sleuth添加了跟踪ID。对于给定请求的所有服务,它保持不变。
- Span ID: Sleuth还添加了Span ID。对于给定请求的不同服务,它在一个工作单元中保持不变,但在不同的服务之间不同。
- Zipkin导出标志: 它指示一个布尔值。它可以是true或
下图显示了Spring Cloud Sleuth令牌。

让我们在我们的项目中实现Spring Cloud Sleuth。
步骤1: 选择项目netflix-zuul-api-gateway-server。
步骤2: 打开pom.xml文件并添加Sleuth依赖项。
<dependency>
    <groupId>org.springframework.cloud</groupId>
    <artifactId>spring-cloud-starter-sleuth</artifactId>
</dependency>现在,我们需要跟踪所有请求。如果要跟踪所有请求,我们需要创建ALWAYS_SAMPLE。我们可以使用Bean创建一个Sampler。
采样器
分布式跟踪可能具有非常大的数据量,因此在分布式跟踪中进行采样很重要。Spring Cloud Sleuth提供了一种采样器策略。借助采样器,我们可以实现控制采样算法的采样算法。默认情况下,如果跨度(相关性:一个单独的操作)已经处于活动状态,我们会获得一个不断执行跟踪的过程。
但是新创建的跨度始终标记为不可导出。如果所有应用程序都使用采样器运行,我们可以在日志中看到跟踪(由跨度组成的端到端延迟图),而不是在任何远程位置。默认情况下,Spring Cloud Sleuth将所有跨度设置为不可导出。
当我们将跨度数据导出到Zipkin或Spring Cloud Stream时,Spring Cloud Sleuth提供AlwaysSampler类,将所有内容导出到Zipkin。它还提供了PercentageBasedSampler类,可以对跨度进行固定比例的采样。
记住:*如果您使用*Spring 2.0.0或更高版本,请使用以下采样器。我们使用相同的采样器,因为我们使用的是Spring版本2.2.1。
@Bean
public Sampler defaultSampler()
{
return Sampler.ALWAYS_SAMPLE;
}
步骤3: 打开NetflixZuulApiGatewayServerApplication.java文件并定义一个Bean。
NetflixZuulApiGatewayServerApplication.java
package com.javatpoint.microservices.netflixzuulapigatewayserver;
import org.springframework.boot.SpringApplication;
import org.springframework.boot.autoconfigure.SpringBootApplication;
import org.springframework.cloud.client.discovery.EnableDiscoveryClient;
import org.springframework.cloud.netflix.zuul.EnableZuulProxy;
import org.springframework.context.annotation.Bean;
import brave.sampler.Sampler;
@SpringBootApplication
@EnableDiscoveryClient
@EnableZuulProxy
public class NetflixZuulApiGatewayServerApplication
{
public static void main(String[] args)
{
SpringApplication.run(NetflixZuulApiGatewayServerApplication.class, args);
}
//creating a bean
@Bean
//creating a sampler called
public Sampler defaultSampler()
{
return Sampler.ALWAYS_SAMPLE;
}
}
在上面的代码中,我们将Spring Cloud Sleuth添加到了Zuul API Gateway服务器中。
现在我们需要在currency-exchange-service和currency-conversion-service中定义Bean。
步骤4: 打开currency-exchange-service的pom.xml并添加Sleuth依赖项。
<dependency>
<groupId>org.springframework.cloud</groupId>
<artifactId>spring-cloud-starter-sleuth</artifactId>
</dependency>
步骤5: 打开CurrencyExchangeServiceApplication.java文件并定义一个Bean。
CurrencyExchangeServiceApplication.java
package com.javatpoint.microservices.currencyexchangeservice;
import org.springframework.boot.SpringApplication;
import org.springframework.boot.autoconfigure.SpringBootApplication;
import org.springframework.cloud.client.discovery.EnableDiscoveryClient;
import org.springframework.context.annotation.Bean;
import brave.sampler.Sampler;
@SpringBootApplication
@EnableDiscoveryClient
public class CurrencyExchangeServiceApplication
{
public static void main(String[] args)
{
SpringApplication.run(CurrencyExchangeServiceApplication.class, args);
}
@Bean
//creating a sampler called always sampler
public Sampler defaultSampler()
{
return Sampler.ALWAYS_SAMPLE;
}
}
步骤6: 同样,打开currency-conversion-service的pom.xml并添加Sleuth依赖项。
<dependency>
<groupId>org.springframework.cloud</groupId>
<artifactId>spring-cloud-starter-sleuth</artifactId>
</dependency>
步骤7: 打开CurrencyConversionServiceApplication.java文件并定义一个Bean。
CurrencyConversionServiceApplication.java
package com.javatpoint.microservices.currencyconversionservice;
import org.springframework.boot.SpringApplication;
import org.springframework.boot.autoconfigure.SpringBootApplication;
import org.springframework.cloud.client.discovery.EnableDiscoveryClient;
import org.springframework.cloud.openfeign.EnableFeignClients;
import org.springframework.context.annotation.Bean;
import brave.sampler.Sampler;
@SpringBootApplication
@EnableFeignClients("com.javatpoint.microservices.currencyconversionservice")
@EnableDiscoveryClient
public class CurrencyConversionServiceApplication
{
public static void main(String[] args)
{
SpringApplication.run(CurrencyConversionServiceApplication.class, args);
}
@Bean
//creating a sampler called always sampler
public Sampler defaultSampler()
{
return Sampler.ALWAYS_SAMPLE;
}
}
现在我们有三个应用程序连接到Spring Cloud Sleuth。
步骤8: 按以下顺序启动应用程序:
netflix-eureka-naming-server
- 打开浏览器并调用URL
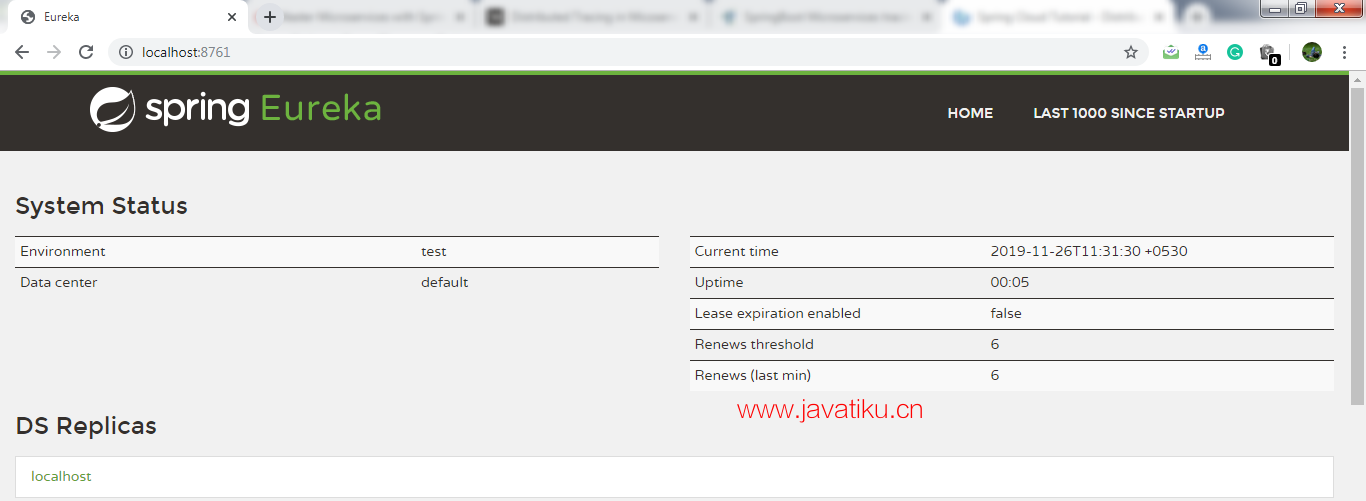
[http://localhost:8761](http://localhost:8761/)。它将返回Eureka界面,如下所示。

currency-exchange-service(端口8000上)
currency-conversion-service
netflix-zuul-api-gateway-server
记住:*在启动每个服务后,请刷新*Eureka服务器。
它显示当前在Eureka服务器上注册的所有实例。

步骤9: 打开CurrencyExchangeController.java文件并添加一个logger。
CurrencyExchangeController.java
package com.javatpoint.microservices.currencyexchangeservice;
import org.slf4j.Logger;
import org.slf4j.LoggerFactory;
import org.springframework.beans.factory.annotation.Autowired;
import org.springframework.boot.autoconfigure.SpringBootApplication;
import org.springframework.core.env.Environment;
import org.springframework.web.bind.annotation.GetMapping;
import org.springframework.web.bind.annotation.PathVariable;
import org.springframework.web.bind.annotation.RestController;
@SpringBootApplication
@RestController
public class CurrencyExchangeController
{
private Logger logger=LoggerFactory.getLogger(this.getClass());
@Autowired
private Environment environment;
@Autowired
private ExchangeValueRepository repository;
@GetMapping("/currency-exchange/from/{from}/to/{to}")       //where {from} and {to} are path variable
public ExchangeValue retrieveExchangeValue(@PathVariable String from, @PathVariable String to)   //from map to USD and to map to INR
{
ExchangeValue exchangeValue = repository.findByFromAndTo(from, to);
//setting the port
exchangeValue.setPort(Integer.parseInt(environment.getProperty("local.server.port")));
logger.info("{}", exchangeValue);
return exchangeValue;
}
}
类似地,我们将logger添加到CurrencyConversionContoller。
步骤10: 打开CurrencyConversionContoller.java文件并添加一个logger。
CurrencyConversionContoller.java
package com.javatpoint.microservices.currencyconversionservice;
import java.math.BigDecimal;
import java.util.HashMap;
import java.util.Map;
import org.slf4j.Logger;
import org.slf4j.LoggerFactory;
import org.springframework.beans.factory.annotation.Autowired;
import org.springframework.http.ResponseEntity;
import org.springframework.web.bind.annotation.GetMapping;
import org.springframework.web.bind.annotation.PathVariable;
import org.springframework.web.bind.annotation.RestController;
import org.springframework.web.client.RestTemplate;
@RestController
public class CurrencyConversionController
{
private Logger logger=LoggerFactory.getLogger(this.getClass());
@Autowired
private CurrencyExchangeServiceProxy proxy;
@GetMapping("/currency-converter/from/{from}/to/{to}/quantity/{quantity}") //where {from} and {to} represents the column
//returns a bean back
public CurrencyConversionBean convertCurrency(@PathVariable String from, @PathVariable String to, @PathVariable BigDecimal quantity)
{
//setting variables to currency exchange service
Map<String, String> uriVariables=new HashMap<>();
uriVariables.put("from", from);
uriVariables.put("to", to);
//calling the currency exchange service
ResponseEntity<CurrencyConversionBean> responseEntity=new RestTemplate().getForEntity("http://localhost:8000/currency-exchange/from/{from}/to/{to}", CurrencyConversionBean.class, uriVariables);
CurrencyConversionBean response=responseEntity.getBody();
//creating a new response bean and getting the response back and taking it into Bean
return new CurrencyConversionBean(response.getId(), from, to, response.getConversionMultiple(), quantity, quantity.multiply(response.getConversionMultiple()), response.getPort());
}
//mapping for currency-converter-feign service
@GetMapping("/currency-converter-feign/from/{from}/to/{to}/quantity/{quantity}") //where {from} and {to} represents the column
//returns a bean
public CurrencyConversionBean convertCurrencyFeign(@PathVariable String from, @PathVariable String to, @PathVariable BigDecimal quantity)
{
CurrencyConversionBean response=proxy.retrieveExchangeValue(from, to);
logger.info("{}", response);
//creating a new response bean
//getting the response back and taking it into Bean
return new CurrencyConversionBean(response.getId(), from, to, response.getConversionMultiple(), quantity, quantity.multiply(response.getConversionMultiple()), response.getPort());
}
}
步骤12: 执行请求http://localhost:8100/currency-converter-feign/from/EUR/to/INR/quantity/100。它返回以下响应,如下所示。

让我们查看控制台中的currency-conversion-service的日志。currency-conversion-service显示以下日志:

我们还可以查看currency-exchange-service的日志。currency-exchange-service显示以下日志:

同样,我们可以查看netflix-zuul-api-gateway-server的日志。

让我们仔细看看不同服务的上述三个日志。我们发现所有三个服务都具有相同的trace Id(533f8d3966d8f4e7)。
Spring Cloud Sleuth为请求分配了一个trace Id。我们可以使用这个Id来跟踪跨多个组件的请求。但是存在一个问题,这个日志分布在多个位置。我们使用Zipkin来解决这个问题。借助Zipkin,我们可以将日志集中在一个地方。
使用Zipkin进行分布式跟踪
我们已经在currency-conversion-service、currency-exchange-service和netflix-zuul-api-gateway-server中安装了Spring Cloud Sleuth依赖项。我们已经看到为每个请求分配了一个唯一的Id。我们使用这些Id来跟踪跨这些多个服务的日志。
然而,在跟踪中,我们面临一个挑战。如果我们要跟踪一个请求,我们必须检查各个应用程序的日志。解决这个问题的解决方案称为中央日志。
我们需要将所有微服务的日志集中在一起。我们可以通过Spring Cloud Sleuth分配的Id进行搜索。在集中的地方,我们将能够搜索并找出特定请求发生了什么。
有以下集中日志的解决方案:
- ELK Stack(Elastic Search)
- Kibana
- Zipkin

在此分布式跟踪中,我们将使用Zipkin分布式跟踪服务器。它为我们提供了所有微服务的汇总视图。我们获取来自各个微服务的所有日志消息。Zipkin服务器会收集这些日志消息。所有微服务都将日志消息放在名为RabbitMQ的队列上,Zipkin从RabbitMQ中提取这些日志消息。Zipkin跟踪服务器连接到数据库。
在我们的情况下,我们使用内存数据库。我们将从数据库中拉取日志消息。在下一步中,我们将安装RabbitMQ。


