Spring Cloud教程-货币转换和货币兑换服务简介

货币转换和货币兑换服务简介
在本节中,我们将创建两个微服务:CurrencyCalculationService 和 CurrencyExchangeService。
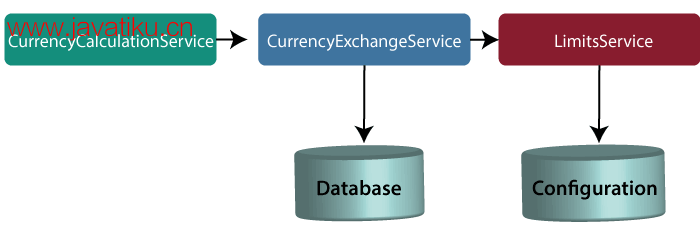
注意:在本教程中,我们将货币转换服务称为货币计算服务。这两个服务具有相同的含义,所以不要混淆。
让我们了解这些服务的功能。
在上图中,CurrencyExchangeService 使用 JPA 与数据库通信,并返回特定货币的汇率。例如,从美元(USD)到印度卢比(INR)的汇率。
当我们调用 CurrencyExchangeService 时,需要传递两个参数:from(要转换的货币)和 to(要转换成的货币)。例如,如果我们想要将货币从美元(USD)转换为印度卢比(INR)。
考虑以下 URL:http://localhost:8000/currency-exchange/from/USD/to/INR。它会返回以下响应:
{
id: 101,
from: "USD",
to: "INR",
conversionMultiple: 72,
port: 8000
}
货币兑换服务将返回汇率。汇率表示 1 美元(USD) 等于 72 印度卢比(INR)。货币转换器服务使用货币兑换服务。假设货币转换器服务想要将 100 美元(USD)转换为印度卢比(INR)。因此,它将调用货币兑换服务,并将我们在路径参数中提供的指定金额进行转换。
例如,我们调用以下 URL:
http://localhost:8100/currency-converter/from/USD/to/INR/quantity/100
{
Id: 101,
from: "USD",
to: "INR",
conversionMultiple: 72,
quantity: 100
totalCalculatedAmount: 7200,
port: 8000
}
我们将在本示例中使用 Spring Cloud 来实现这两个服务。
设置 currency-exchange-service
步骤 1: 打开 Spring Initializer http://start.spring.io。
步骤 2: 选择 Project:Maven Project,Language:Java,Spring Boot 版本 2.2.0 M6 或更高。提供 Group name 和 Artifact ID。我们提供的分别是 cn.javatiku.microservices 和 currency-exchange-service。
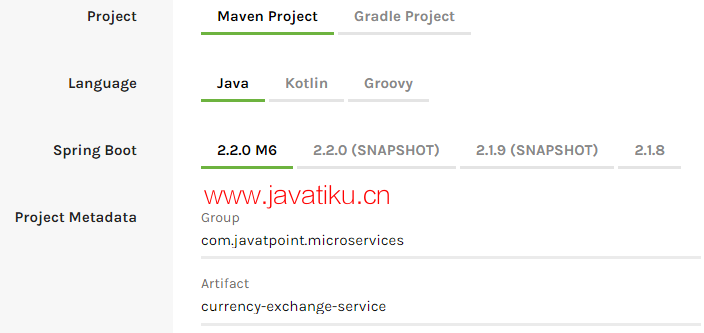
步骤 3: 添加依赖项 Web、DevTools、Actuator 和 Config Client。
步骤 4: 点击 Generate Project 按钮,它会下载项目的 zip 文件。
步骤 5: 将其解压到本地磁盘。
步骤 6: 导入项目。
点击文件菜单-> 导入 -> 现有的 Maven 项目 -> 下一步 -> 浏览 -> 选择项目 -> 完成
导入需要一些时间。导入项目完成后,它会显示以下项目目录。不要考虑目录中的 data.sql 文件,因为我们稍后会创建它。
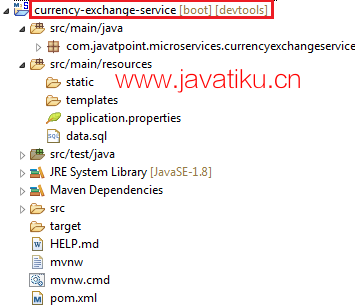
步骤 7: 打开 application.properties 文件并配置 application name 和 port 号。
application.properties
spring.application.name=currency-exchange-service.
server.port=8000
当我们运行 currency-exchange-service 时,它会运行,但不会执行任何服务。在下一步中,我们将在 currency-exchange-service 中实现代码。
在 currency-exchange-service 中硬编码
现在,我们将创建一个服务,将货币从美元(USD)转换为印度卢比(INR)。
步骤 1: 在包 cn.javatiku.microservices.currencyexchangeservice 中创建一个名为 CurrencyExchangeController 的类文件(REST 控制器)。
CurrencyExchangeController.java
package cn.javatiku.microservices.currencyexchangeservice;
import java.math.BigDecimal;
import org.springframework.boot.SpringApplication;
import org.springframework.boot.autoconfigure.SpringBootApplication;
import org.springframework.web.bind.annotation.GetMapping;
import org.springframework.web.bind.annotation.PathVariable;
import org.springframework.web.bind.annotation.RestController;
@SpringBootApplication
@RestController
public class CurrencyExchangeController
{
@GetMapping("/currency-exchange/from/{from}/to/{to}")       //where {from} and {to} are path variable
public ExchangeValue retrieveExchangeValue(@PathVariable String from, @PathVariable String to)  //from map to USD and to map to INR
{
return new  ExchangeValue(1000L, from, to, BigDecimal.valueOf(65));
}
}
步骤 2: 创建一个名为 ExchangeValue 的类文件。
ExchangeValue.java
package cn.javatiku.microservices.currencyexchangeservice;
import java.math.BigDecimal;
public class ExchangeValue
{
private Long id;
private String from;
private String to;
private BigDecimal conversionMultiple;

public ExchangeValue()
{
}
//generating constructor using fields
public ExchangeValue(Long id, String from, String to, BigDecimal conversionMultiple) {
super();
this.id = id;
this.from = from;
this.to = to;
this.conversionMultiple = conversionMultiple;
}
//generating getters
public Long getId()
{
return id;
}
public String getFrom()
{
return from;
}
public String getTo()
{
return to;
}
public BigDecimal getConversionMultiple()
{
return conversionMultiple;
}
}
步骤 3: 运行 CurrencyExchangeServiceApplication.java。它会在我们在 application.properties 文件中配置的端口 8000 上运行。
在浏览器上刷新,我们会得到以下响应:
{
id: 101,
from: "USD",
to: "INR",
conversionMultiple: 72,
port: 8000
}
在响应中设置动态端口
CurrencyExchangeService 确定货币的汇率。CurrencyCalculationService 使用 CurrencyExchangeService 来确定一种货币在其他货币中的价值。我们稍后将在下一个主题中创建多个 CurrencyExchangeService 的实例。
目前,服务正在 8000 端口上运行。稍后我们将在 8001、8002 等端口上运行。在下一步中,我们将为 currency-exchange-service 设置一个端口。
步骤 1: 打开 ExchangeValue.java 文件并添加一个 port 变量。只为 port 变量生成 getter 和 setter 方法。
ExchangeValue.java
package cn.javatiku.microservices.currencyexchangeservice;
import java.math.BigDecimal;
public class ExchangeValue
{
private Long id;
private String from;
private String to;
private BigDecimal conversionMultiple;
private int port;
public ExchangeValue()
{
}
//generating constructor using fields
public ExchangeValue(Long id, String from, String to, BigDecimal conversionMultiple) {
super();
this.id = id;
this.from = from;
this.to = to;
this.conversionMultiple = conversionMultiple;
}
//generating getters
public int getPort() {
return port;
}
public void setPort(int port) {
this.port = port;
}
public Long getId()
{
return id;
}
public String getFrom()
{
return from;
}
public String getTo()
{
return to;
}
public BigDecimal getConversionMultiple()
{
return conversionMultiple;
}
}
我们已经在 application.properties 文件中配置了应用程序名称和端口号,因此不需要再次配置。
现在从环境中获取端口号。
步骤 3: 打开 CurrencyExchangeController.java 并获取环境属性。
CurrencyExchangeController.java
package cn.javatiku.microservices.currencyexchangeservice;
import java.math.BigDecimal;
import org.springframework.beans.factory.annotation.Autowired;
import org.springframework.boot.autoconfigure.SpringBootApplication;
import org.springframework.core.env.Environment;
import org.springframework.web.bind.annotation.GetMapping;
import org.springframework.web.bind.annotation.PathVariable;
import org.springframework.web.bind.annotation.RestController;
@SpringBootApplication
@RestController
public class CurrencyExchangeController
{
@Autowired
private Environment environment;
@GetMapping("/currency-exchange/from/{from}/to/{to}") //where {from} and {to} are path variable
public ExchangeValue retrieveExchangeValue(@PathVariable String from, @PathVariable String to)  //from map to USD and to map to INR
{
//taking the exchange value
ExchangeValue exchangeValue= new ExchangeValue (1000L, from, to, BigDecimal.valueOf(65));
//picking port from the environment
exchangeValue.setPort(Integer.parseInt(environment.getProperty("local.server.port")));
return exchangeValue;
}
}
当我们刷新浏览器时,URL 变为:http://localhost:8000/currency-exchange/from/USD/to/INR。
{
id: 1000,
from: "USD",
to: "INR"
conversionMultiple: 65,
port: 8000
}
目前,CurrencyExchangeServiceApplication 正在 8000 端口上运行。
现在我们将在不同的端口号上运行 CurrencyExchangeServiceApplication。为此,我们必须将端口从 8000 更改为 8001、8002 等,根据我们的需要。
假设我们要创建两个 CurrencyExchangeServiceApplication 的实例。为此,我们必须在外部设置端口。
让我们创建一个在端口 8001 上运行的 CurrencyExchangeServiceApplication 实例。
步骤 1: 右键单击项目 -> Run As -> Run Configurations。
或者点击高亮的符号 -> Run Configurations。
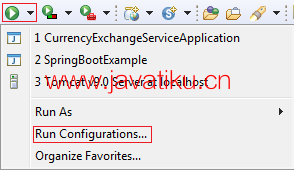
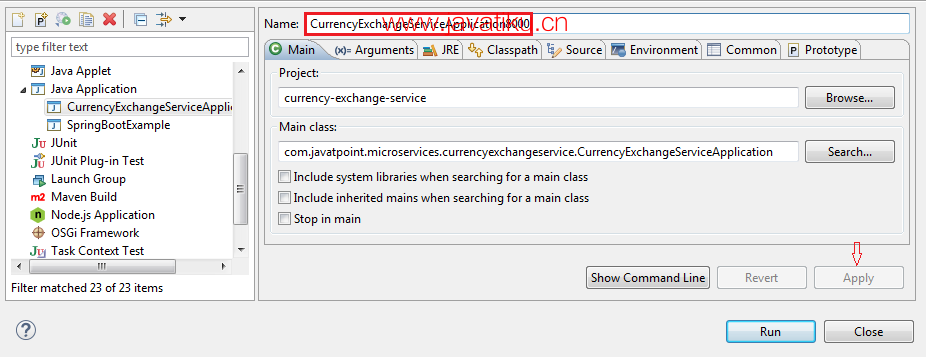
步骤 2:将 CurrencyExchangeServiceAppication 重命名为 CurrencyExchangeServiceAppication8000,然后单击 Apply 按钮。
步骤 3: 右键单击 CurrencyExchangeServiceApplication8000 -> Duplicate。
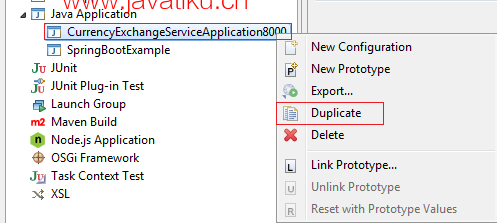
它会生成 CurrencyExchangeServiceApplication8000 的副本文件。我们将在端口 8001 上运行它。
步骤 4: 点击 Arguments 选项卡,并在 VM arguments 文本框中写入 –Dserver.port=8001。依次点击 Apply 和 Run 按钮。
注意:无论我们在 VM arguments 中传递什么值,它都会覆盖 application.properties 文件的配置。
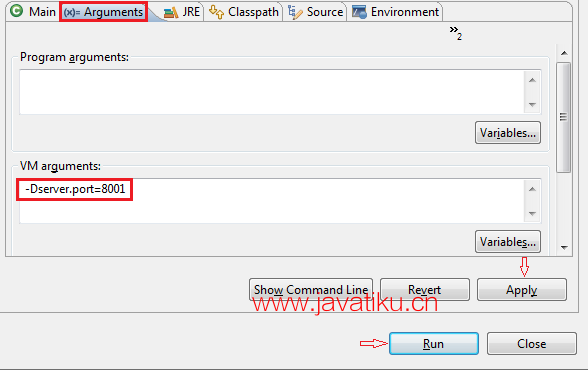
点击 Run 按钮后,它将在端口 8001 上开始运行。
步骤 5: 更改 URL 中的端口号为 8001,并按回车键。我们会得到以下响应:
{
id: 1000,
from: "USD",
to: "INR",
conversionMultiple: 65,
port: 8001
}
现在,我们有两个 CurrencyExchangeServiceApplication 的实例,分别在不同的端口 8000 和 8001 上运行。


